Ever pull out your favorite sterling silver necklace only to find it covered in a dull, dark film? That’s not just grime—it’s tarnish. And it’s a totally natural chemical reaction.
Think of it as silver’s response to its environment. When your jewelry comes into contact with sulfur compounds in the air, a thin layer of corrosion forms, masking that brilliant shine we all love.
Several everyday things can speed up this process:
- Humidity: Moisture in the air is a major culprit.
- Chemicals: Think about your daily routine—lotions, perfumes, hairspray, and even household cleaners can cause silver to discolor surprisingly fast.
- Your Skin: Your unique body chemistry, including the pH and oils on your skin, also plays a role in how quickly your pieces tarnish.
Understanding this basic science is the first step to keeping your silver looking its best. It’s not about stopping an inevitable process, but about managing it like a pro. Thankfully, learning how to clean your silver at home is simple, and you probably have everything you need in your kitchen already.
To really get into the nitty-gritty of why this happens, you can explore our full guide on what causes jewelry to tarnish.
The best part? Tarnish is just on the surface. It doesn't actually harm the metal underneath. With the right techniques, you can easily bring back your silver's original luster without causing any damage.
This growing desire for proper jewelry care has created a huge market. In fact, the global demand for gold and silver cleaners was valued at around USD 2.5 billion in 2023 and is projected to hit USD 4.1 billion by 2032. It just goes to show how many of us are looking for reliable ways to maintain our treasured collections. This guide will give you the foundation you need to keep your silver sparkling for years.
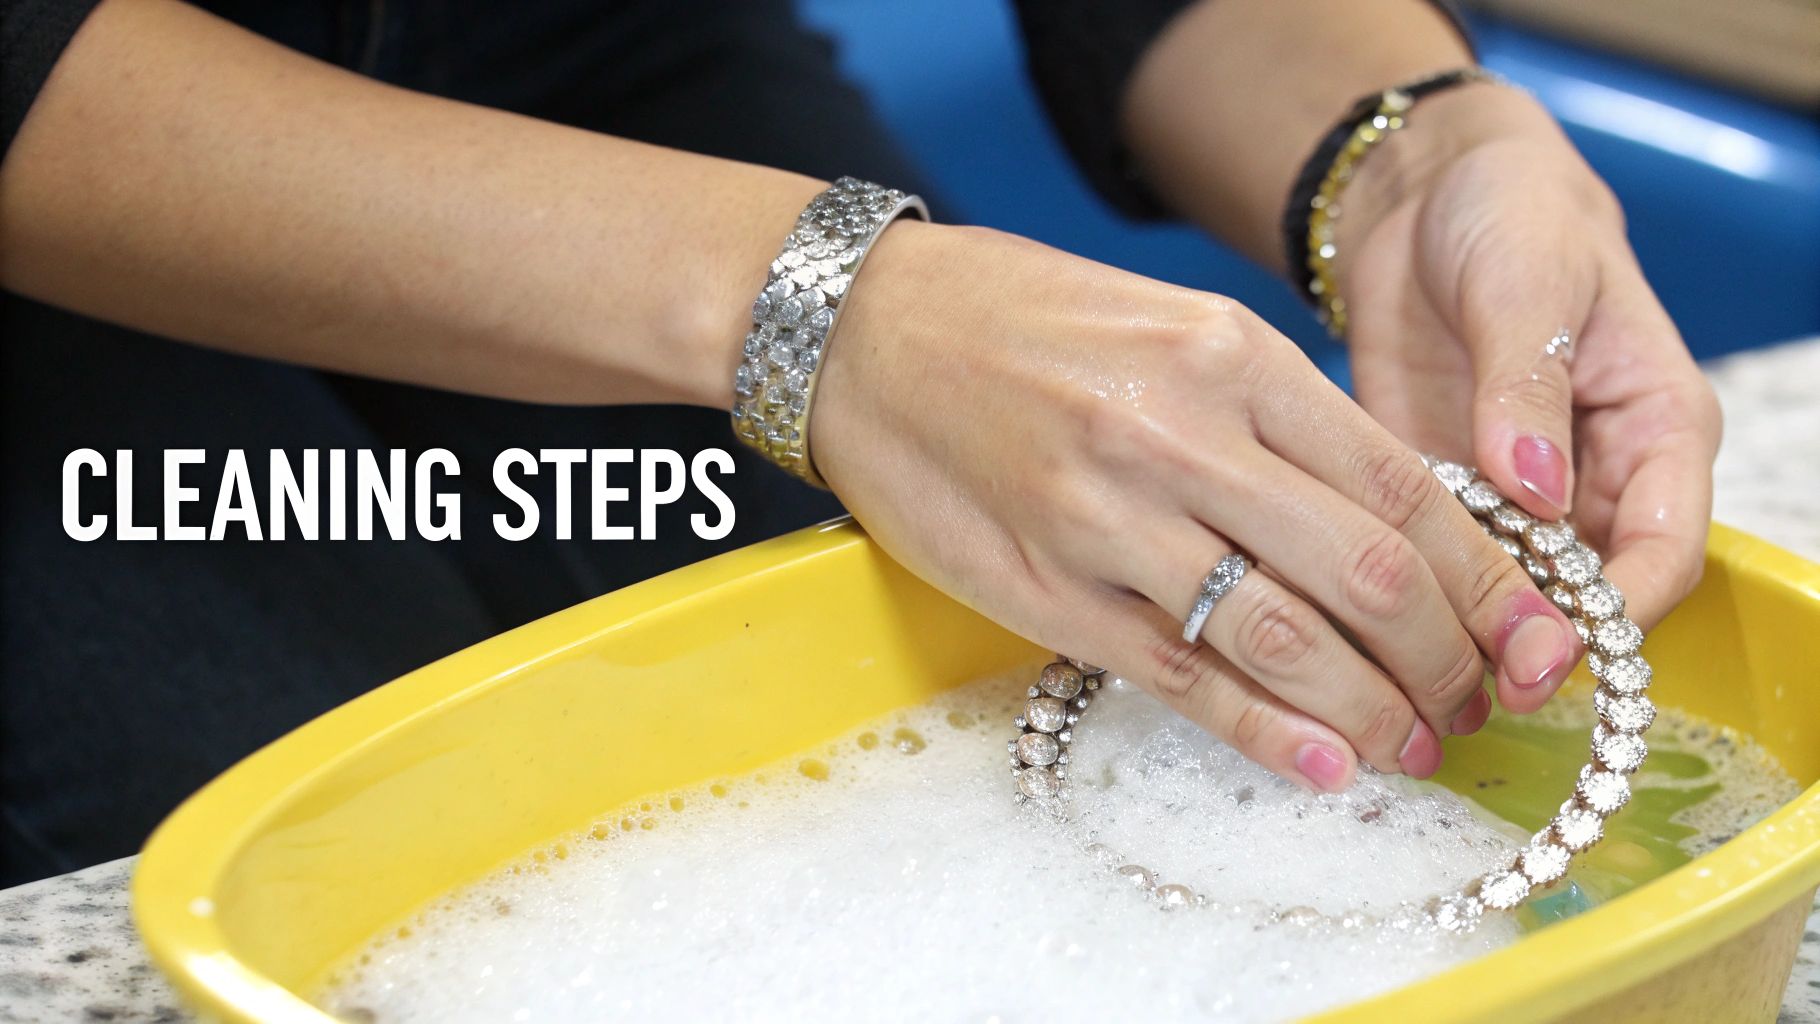
The Gentle Soap and Water Method for Regular Care
For regular upkeep, or when you notice your favorite pieces looking just a little dull, this is your go-to technique. Think of it as the gentlest approach for how to clean silver jewelry at home, and it's perfect for the pieces you wear all the time.
This simple soap and water bath is also my top recommendation for any jewelry featuring soft or porous gemstones like pearls, opals, or turquoise. These stones are sensitive and can be easily damaged by harsher chemicals, so a mild approach is non-negotiable.
Prepping Your Cleaning Bath
First things first, let's create a simple cleaning solution. Grab a small bowl and fill it with warm—not hot—water. Add just a few drops of a mild, ammonia-free dish soap and give it a quick swirl until you see some light suds form.
Now, place your silver jewelry right into the solution, making sure every part is fully submerged. Let everything soak for about 5-10 minutes. This brief soak is often all you need to loosen everyday buildup like dust, oils, and lotion residue.
After soaking, you might still see some stubborn grime clinging to small crevices, like between chain links or around stone settings. For these tricky spots, grab an extra-soft baby toothbrush. Use it to gently scrub the area. The soft bristles are perfect for working their way into tiny details without scratching the silver’s surface.
Be incredibly gentle during this step. The goal isn’t to scrub away heavy tarnish but to dislodge light dirt. Aggressive scrubbing, even with a soft brush, can cause micro-scratches over time.
Rinsing and Drying for a Perfect Finish
Once you're satisfied, rinse your jewelry thoroughly under cool, running water. It's vital to get all the soap residue off, as any leftover film can dull the final shine.
Finally, lay the pieces on a soft, lint-free microfiber cloth and pat them completely dry. Taking the time to dry your jewelry properly prevents water spots from forming and is the key to restoring that brilliant, reflective luster you love.
Tackling Heavy Tarnish with Baking Soda and Foil
For those pieces with stubborn, deep-set tarnish that a simple soap wash just can’t handle, there’s a more powerful method that feels a bit like a home science experiment. Using just baking soda and aluminum foil, you can create a safe electrochemical reaction that lifts tarnish right off your jewelry—no harsh scrubbing required.
This process works by transferring the sulfur—the culprit behind tarnish—from your silver to the aluminum foil. The hot water and baking soda act as an electrolyte solution, creating a tiny "battery" that pulls the sulfur atoms away from your precious pieces and onto the foil. It’s chemistry in action.
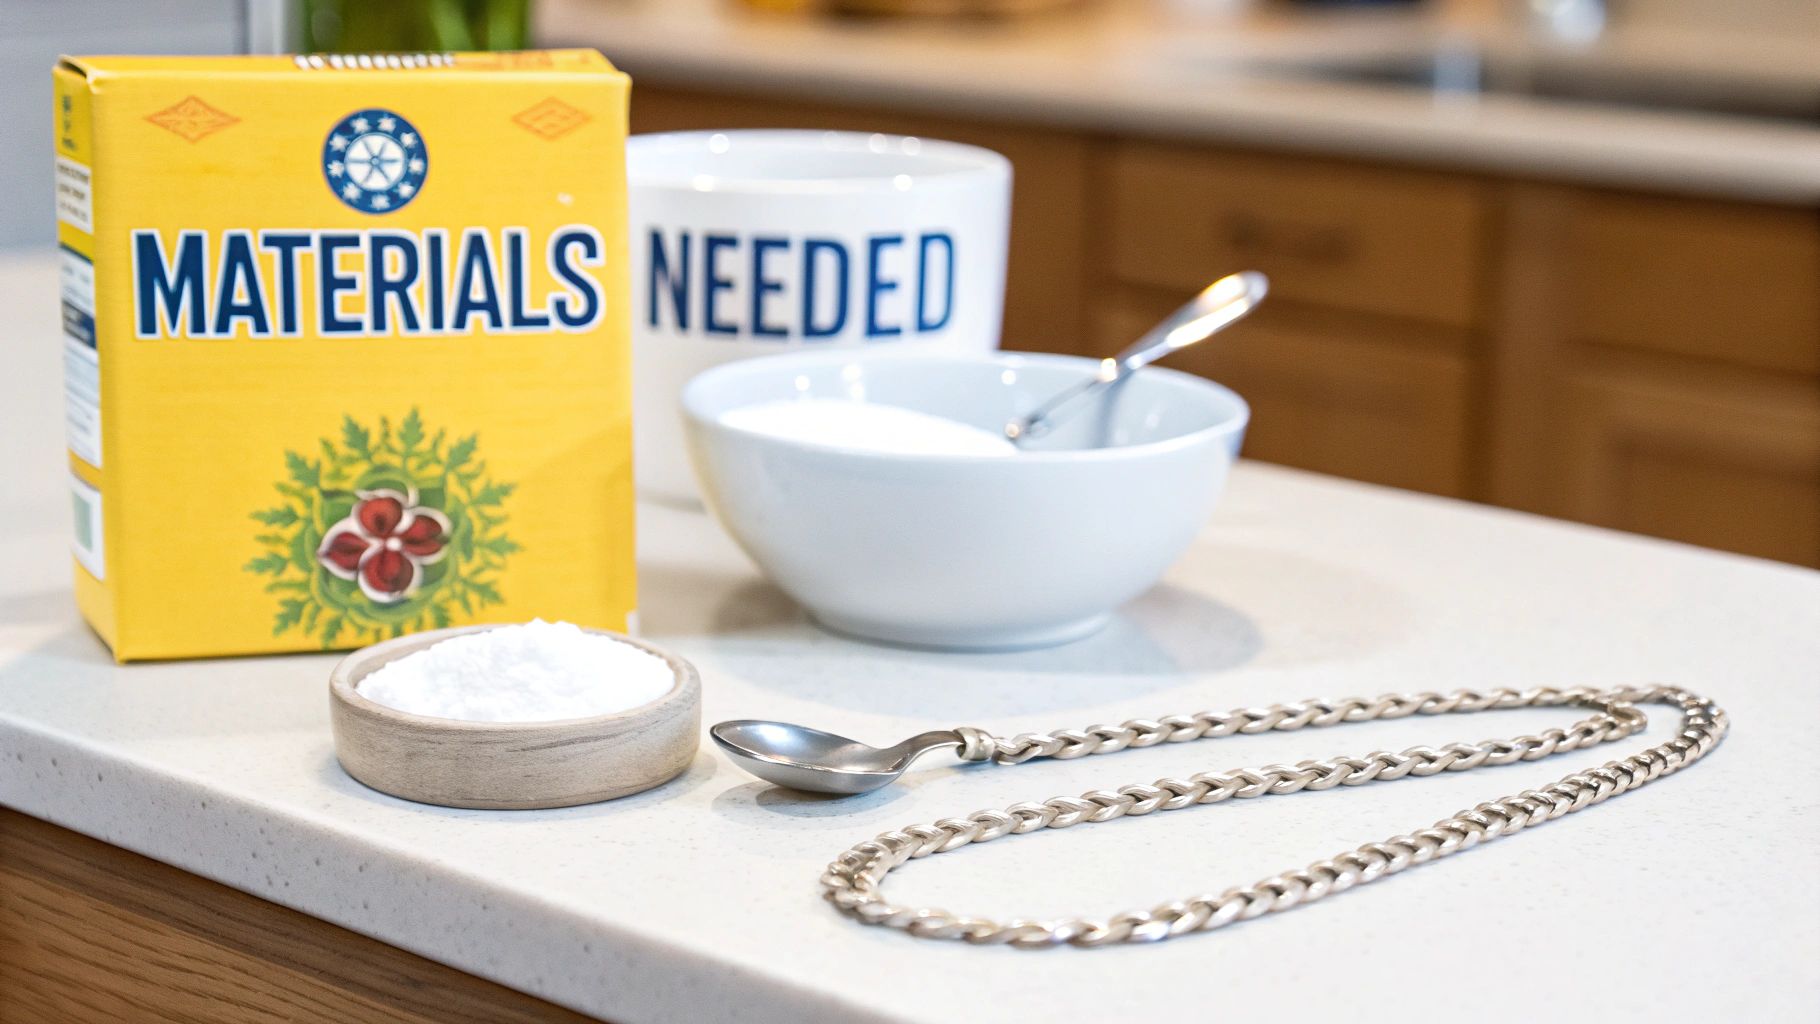
What You'll Need
Before you start, gather these common household items. Having everything ready to go makes the whole process smooth and much more effective.
- A bowl or dish lined with aluminum foil (shiny side up)
- Baking soda
- Boiling water
- Tongs (to safely handle hot jewelry)
The most important part of the setup is ensuring every piece of jewelry makes direct contact with the aluminum foil. This connection is what allows the chemical reaction to happen, so avoid overcrowding the bowl. Work in batches if you need to.
A Crucial Note on What to Avoid: This method is fantastic for solid sterling silver, but it’s too aggressive for certain pieces. Do not use this technique on jewelry with glued-in stones, intentional oxidized finishes, or soft gemstones like pearls, opals, and turquoise. The heat and chemical reaction can easily damage these delicate elements.
The Cleaning Process
This simple, three-step process is easy to follow and incredibly effective for bringing your silver back to life.
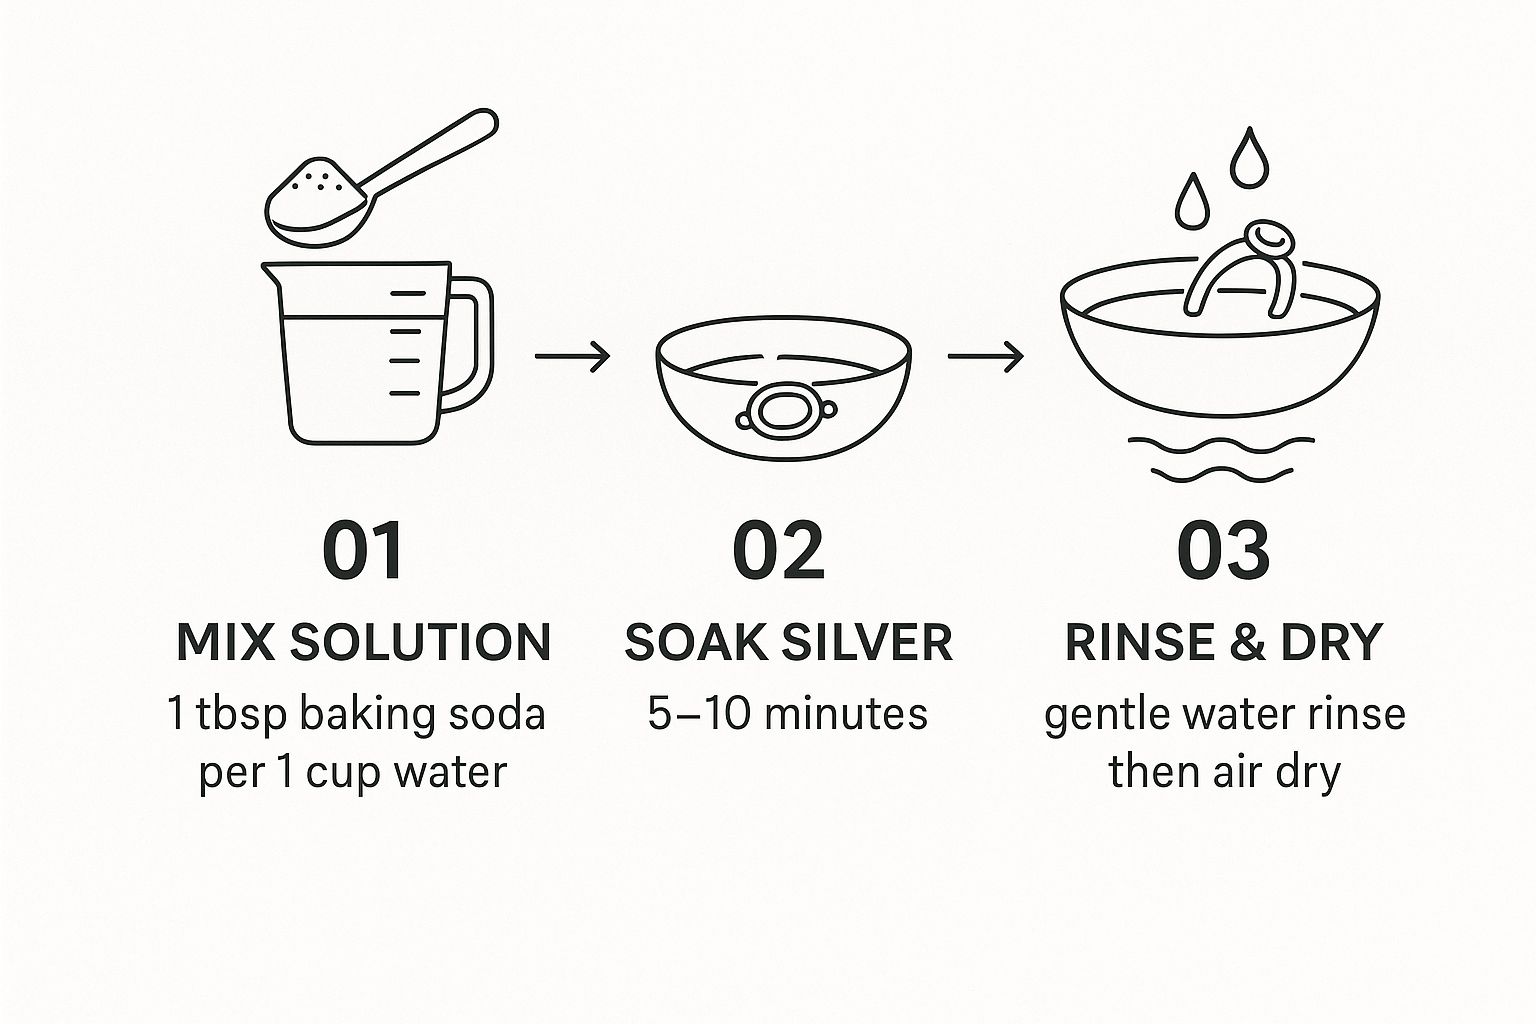
As the infographic shows, all it takes is about one tablespoon of baking soda per cup of water and a short soak to tackle even significant tarnish.
First, place your silver items into the foil-lined bowl, making sure they’re touching the foil. Sprinkle a generous amount of baking soda over them—again, about one tablespoon for every cup of water you plan to add.
Next, carefully pour boiling water into the bowl until the jewelry is completely covered. You’ll notice an immediate fizz and bubbling; that’s the reaction working its magic.
Let the jewelry soak for about 5-10 minutes, depending on how heavy the tarnish is. When the time is up, use tongs to carefully remove the pieces. Rinse them thoroughly under cool running water to get rid of any residue, and gently pat them dry with a soft, lint-free cloth. You'll be amazed at the shine.
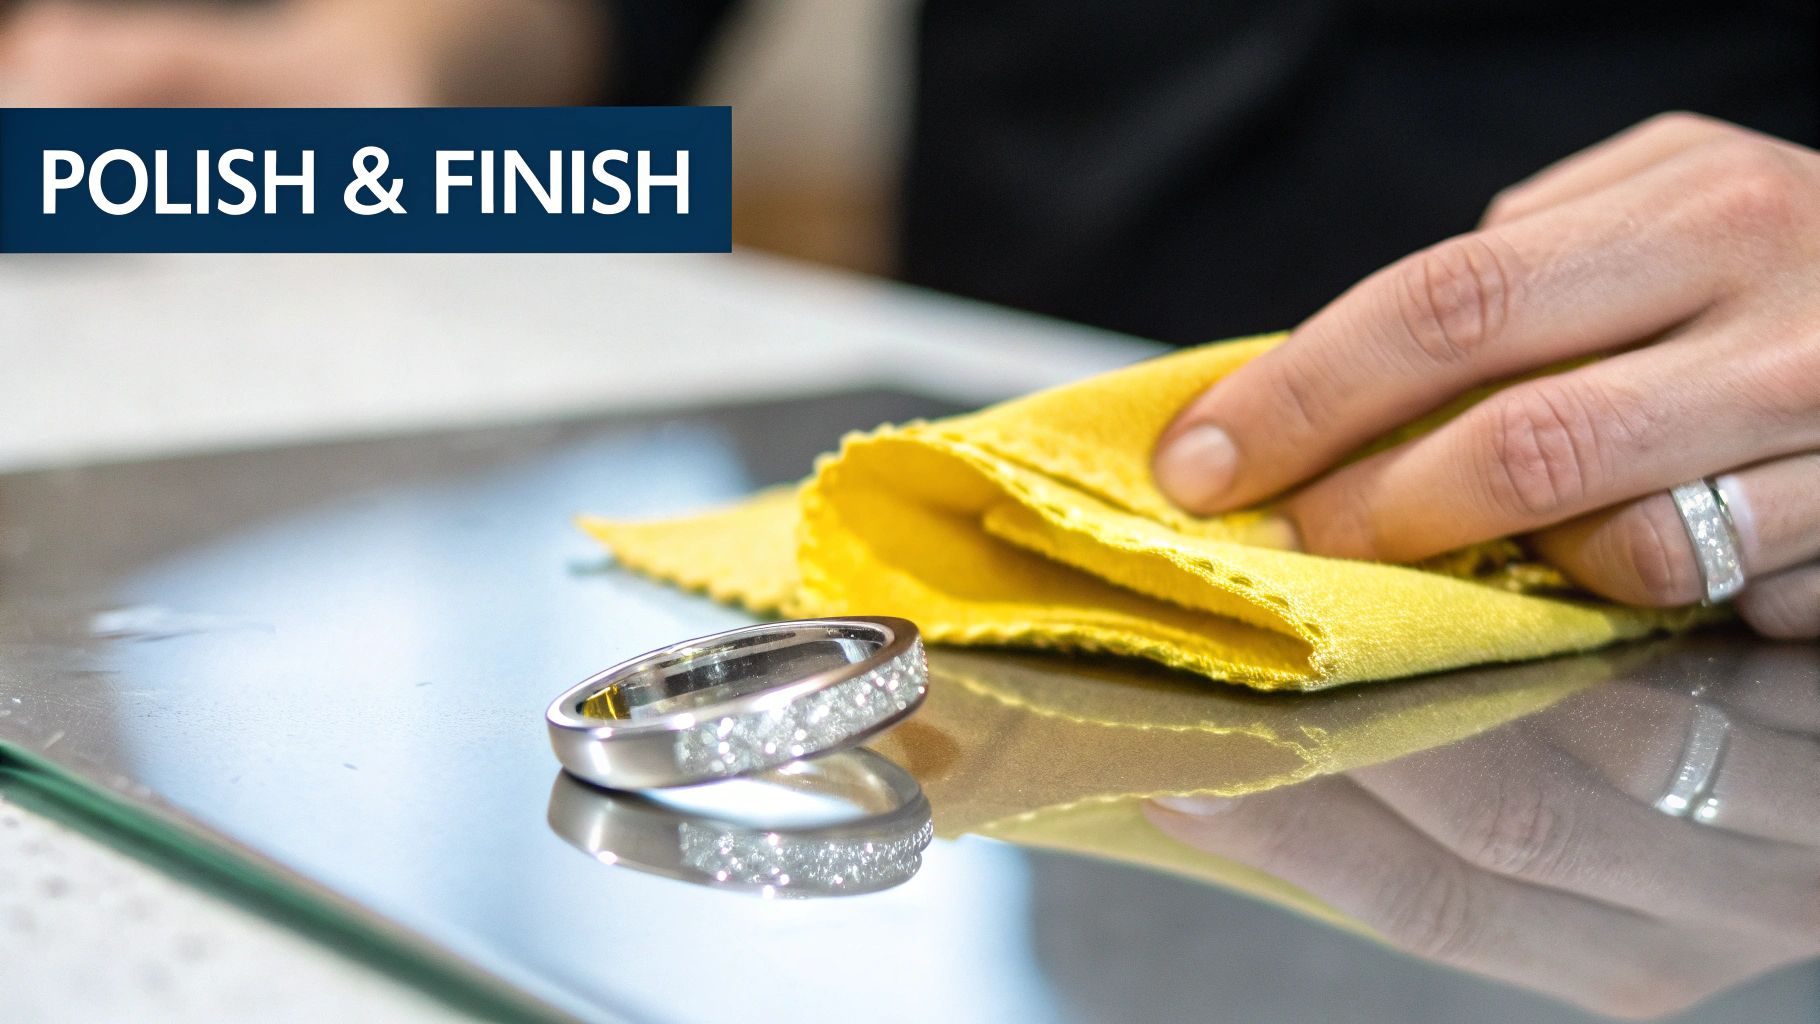
Polishing Your Silver With Common Household Products
Sometimes your silver isn't heavily tarnished, but just needs a quick buff to bring back its sparkle. For those moments, you can skip the deep cleaning and reach for a couple of pantry staples to gently lift away minor dullness.
A simple baking soda paste is a fantastic go-to. All you need is a little bit of baking soda mixed with a few drops of water until it forms a toothpaste-like consistency. This creates a mild, effective abrasive perfect for light surface grime. Another old-school trick is using a non-gel, non-whitening toothpaste, which works on the same principle.
The Right Way To Buff And Shine
Once you have your paste, dab a small amount onto a soft, lint-free cloth—a microfiber one is ideal for this. Gently rub the paste onto your silver using soft, circular motions. This technique helps lift residue without creating the tiny micro-scratches that aggressive back-and-forth scrubbing can cause.
The most critical step here is the rinse. After you’ve finished polishing, you have to rinse your jewelry thoroughly under cool water to get all that leftover paste off. If any residue is left behind, it will dry into a dull, chalky film, completely defeating the purpose of your hard work.
After rinsing, pat the piece completely dry with another clean, soft cloth. This prevents water spots and really lets you see its true shine. This kind of hands-on approach is incredibly popular, especially as at-home jewelry care continues to grow. In fact, North America accounted for over 30% of the global jewelry cleaner market in 2023, which shows just how many of us prefer a good DIY solution.
Learning to polish your silver properly is a key skill for any jewelry lover. For more expert tips, check out our complete guide on how to clean sterling silver jewelry. And always remember to steer clear of harsh tools like stiff brushes or abrasive scouring pads—they will cause permanent damage to your cherished pieces.
How To Keep Tarnish Away: Storage and Care Tips
While knowing how to clean your silver is a fantastic skill, the best trick is to prevent tarnish in the first place. With just a few simple habits, you can seriously slow down the tarnishing process and keep your favorite pieces looking brilliant for much longer.
It all comes down to one core idea: limit your silver’s exposure to air and moisture. These are the two biggest culprits behind that frustrating dark film. Your first line of defense? Smart storage. Leaving your jewelry out on a dresser is practically an invitation for tarnish to move in.
Smart Storage Solutions
An airtight container is your absolute best friend here. This doesn’t have to be fancy—a small, individual ziplock bag works wonders. A dedicated felt-lined jewelry box with separate compartments is even better. The goal is simple: create a barrier between your silver and the open air.
Want to take it up a notch? Toss in an anti-tarnish strip or a small silica gel packet (yes, like the ones you find in new shoe boxes). These little additions are designed to absorb moisture and airborne sulfur, the very things that make silver tarnish. It's a tiny, inexpensive step that makes a world of difference over time.
Expert Tip: Avoid storing your silver jewelry in the bathroom or near a sunny window. The humidity and temperature swings in those spots are a recipe for tarnish. A cool, dry place like a bedroom drawer or a closet is the perfect spot.
The “Last On, First Off” Rule
This next habit is a game-changer: the "last on, first off" rule. It’s exactly what it sounds like. Always put your jewelry on after you’ve finished applying lotions, perfumes, hairspray, and makeup. These products are full of chemicals that can react with silver and speed up discoloration.
By the same token, make taking your jewelry off the first thing you do when you get home. This minimizes its exposure to your skin's natural oils and whatever else you've come into contact with during your day. Following this simple routine is one of the easiest and most effective ways to preserve your silver's shine. For an even deeper dive, explore our full guide on how to care for sterling silver and make your pieces last a lifetime.
When to Use a Commercial Silver Cleaner
While learning how to clean silver jewelry at home with common household ingredients is a fantastic skill, there are moments when reaching for a dedicated commercial cleaner is the smarter, safer move. For those precious antique pieces, heavily tarnished heirlooms, or jewelry with intricate filigree, a professional-grade product often delivers far more consistent results.
These cleaners are expertly formulated to tackle tarnish without the guesswork. You get an even, brilliant finish, which is especially critical when you're trying to preserve the original patina on an old family piece. It's about restoring brilliance without stripping away its unique character.
Choosing the Right Product
Commercial cleaners aren't one-size-fits-all. They generally come in two main forms: polishes and dips. Knowing which one your jewelry needs is crucial to getting it right.
-
Silver Polishes: Think of these as your go-to for routine maintenance. They come as creamy lotions or pre-treated cloths and are perfect for handling light to moderate tarnish. Polishes give you precise control, making them ideal for the pieces you wear often. A good polishing cloth is an absolute must-have for quick, gentle touch-ups before a night out.
-
Silver Dips: These are the heavy hitters. Dips are powerful liquid solutions designed for severe, stubborn tarnish. You just dip the item for a few seconds, and the chemical reaction dissolves the tarnish almost instantly. But—and this is a big but—they are very strong and must be used with caution, especially on pieces with gemstones or intentional oxidized details you want to keep.
Always, always read the product label before you buy and before you use it. Make sure the formula is safe for any gemstones on your piece. The harsh chemicals in some dips can easily damage soft or porous stones like pearls, turquoise, or opals.
When you invest in a beautiful piece from a collection like ours at Precious Pulse Jewelry, using the right cleaner is key to protecting its value and beauty for years to come. For a heavily blackened sterling silver chain, a quick dip might be the perfect solution. But for a lightly dulled bracelet with delicate engravings, a gentle polish is definitely the better, safer choice.
Common Questions About Cleaning Silver at Home
Even with the best instructions, you probably have a few lingering questions. When you're dealing with treasured pieces, you want to be 100% confident before you start. Let's tackle some of the most common things people ask about at-home silver care.
How Often Should I Really Be Cleaning My Silver?
The best answer depends entirely on how often you wear a piece and how it's stored.
For jewelry that's part of your daily uniform—like a favorite ring or a simple chain necklace—a quick wipe with a soft polishing cloth after each wear is a fantastic habit. This removes the day’s oils and grime before they can react with the metal. For pieces you wear less often, a gentle soap-and-water bath every few weeks or when you notice dullness is perfect for a more thorough clean. Heavy-duty methods like the foil and baking soda trick should be reserved for when you see significant tarnish, which might only be a few times a year if you store your items properly.
A word of caution: It's easy to overdo it. Aggressive cleaning, especially with abrasive pastes, will slowly wear away the surface of your silver. When in doubt, less is more.
What About Silver-Plated Jewelry? Can I Clean It the Same Way?
You must be extremely careful here. "Plated" means you’re dealing with a very thin layer of silver over a different base metal. This delicate coating can be easily damaged.
Aggressive scrubbing, harsh chemicals, or abrasive pastes like baking soda can strip that thin plating right off, exposing the less-attractive metal underneath. For silver-plated items, stick to the gentlest method only: a quick wash with mild soap and water, followed by a careful pat-down with a soft, non-abrasive cloth. Avoid the foil and baking soda method entirely, as the chemical reaction is too harsh for plated finishes.
Is It Safe to Clean Jewelry with Gemstones at Home?
This is a critical question, as the wrong method can cause permanent damage. The answer depends entirely on the stone.
- Hard, non-porous stones like diamonds, sapphires, and rubies are generally tough. They can usually handle a gentle soap and water bath without any issues.
- Soft, porous stones like pearls, opals, turquoise, and coral are a completely different story. They can be permanently damaged by chemicals, intense heat, and even prolonged soaking in water. For any jewelry with these delicate stones, the safest approach is to use a dry polishing cloth on the silver parts only, avoiding the gems.
- Glued-in stones of any kind should never be submerged in water. Moisture will weaken the adhesive, causing the stone to loosen or fall out.
When in doubt about a specific stone, it's always best to consult a professional jeweler.
Knowing the right way to care for your jewelry is key to keeping it beautiful for years to come. If you're looking to add some new, easy-to-care-for pieces to your collection, explore the stunning 925 sterling silver options at Precious Pulse Jewelry. Find your next favorite piece today at https://preciouspulsejewelry.com.